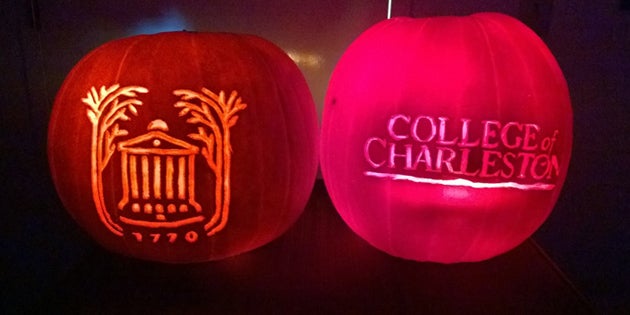
 Every year Ale Torres carves an amazing College of Charleston-themed pumpkin. They’re works of art, which could have been done by a sculptor or professional carver.
RELATED: Watch a timelapse video of Torres’ most recent carving.
But, Torres, an information technology field support manager at the College, carved his first pumpkin just three or four years ago – with no art background or prior planning. And he does it with an inexpensive set of plastic tools.
Torres gives hope to all novice pumpkin carvers – you CAN have the best pumpkin in the neighborhood!
His advice? Go back to what you learned as a kid – connect the dots and stay in the lines.
RELATED: Share photos of your carved pumpkins with us on Twitter or Instagram using #CofC.
1. Have a plan.
 Torres uses Microsoft Paint or one of the Adobe Creative Suite products to make a design that is three colors. The lightest color is where he cuts all the way through the pumpkin, the medium color is where he shaves the outer skin off, and the darkest area is where the pumpkin is left intact.
He then prints his drawing and pokes dots as a guide and begins cutting.
TIP: Make sure you anchor every part you’re carving to a solid part of the pumpkin.
2. Don’t cut all the way through the pumpkin unless you have to.
Torres recommends making smaller cuts because you can always cut more. He also heavily relies on “shaving” or just taking off the outer skin of the pumpkin.
“Just shaving off a very small part keeps the pumpkin intact, then smaller pieces are less likely to break off,” he explains. “In my carving of the College’s new logo, I didn’t cut all the way through the pumpkin at all – everything is shaved.”
TIP: A $5 wood shaving kit from Hobby Lobby is a good investment.
3. Try to keep the carving simple.
 Torres’ College of Charleston pumpkins look incredibly complex, but he insists they’re not.
“Logos are usually simple, and easy to turn to three colors,” Torres explains. “That said, the hardest pumpkin I ever did was one of the College’s old athletic logos. There were so many dots, it was hard to figure out which ones went together!”
TIP: Keep your template handy – it is easy to get confused about what you should cut!
4. Light your pumpkin BEFORE you finish.
Torres says a lit pumpkin looks different than a dark one, so make your final tweaks with the pumpkin lit.
TIP: Use a light bulb or LED light instead of a candle.


